
DIY: Transforming Unstable TP-Link Archer C6 Cloud Wi-Fi Router to a Stable OpenWRT-based Cloud Wi-Fi Router

With every firmware upgrade things went from bad to worse and other than the 2.4GHz stability issue, I also started facing issues with QoS, DDoS filtering and LAN access. Though the Router was under warranty I decided last night to go with the OpenWRT route. Though OpenWRT is a reputed non-OEM firmware, it did not have Cloud support for my Router. So with some experiments conducted on my RaspberryPi, I decided to make the Router an IoT device and install IoT services through which I could manage the Router from the cloud. Please go through the detailed instructions below if you want to make your Router an OpenWRT Cloud Router. Do keep in mind that you will loose product warranty for not using OEM firmware (though you can restore back to OEM firmware later on if required). You should also ensure that you have a Wi-Fi Router with sufficient on-board memory to support OpenWRT and other additional packages that need to be installed.
Google Drive File Stream download for non-GSuite Users

#Google announced few months back that it will be offering #GoogleDriveFileStream even for non- #GSuite users. Surprisingly you still don't get a proper Download Page similar to #GoogleDrive #BackupAndSync.
After some searching found that you can download Drive File Stream from one of the following links -
Though the download file names are surprisingly different, they are the same files with the same version.
#DriveFileStream is like a Sharepoint drive mapped in #Windows #FileExplorer . Only those marked #offline will get downloaded.
Internet Revolution: From 33.6 kbps PSTN Dialup in 1999 to 1 Gbps Always-on Fibre Internet in 2020, we have come a long way!
 A few days back a read an article
of Kapil Jain (from Tata Communications) about his 25 years journey of Internet
in India starting with 15-Aug-1995. It makes me look back into my own journey
not from 1995, but from 1996.
A few days back a read an article
of Kapil Jain (from Tata Communications) about his 25 years journey of Internet
in India starting with 15-Aug-1995. It makes me look back into my own journey
not from 1995, but from 1996.
So in 1996 I joined NIIT (a reputed Computer Training institute in India) through the Bhavishyajyoti Scholarship scheme somewhere during mid-year. It was the Mumbai, Santacruz (W), Hasanabad Lane centre which was quite reputed those days. It was around the end of the year that Dial-up Internet connectivity arrived at the centre. There were many families invited to demonstrate what Internet was. I was lucky enough to get the first glance, being a volunteer in the centre. It was provided by VSNL those days and due to errors in Telephone lines, the connectivity would drop often. It would probably take a minute or 2 to just load an image in a website. The Internet was also available in 2 variants – Text and Graphical. If you had the Text package, then you would dial using Hyperterminal and then be presented with Linux logon prompt and post login we had to use the Lynx browser which would present the webpage in a non-graphical (Black & White) format. I had a close friend (Anish) who had all the latest things at his house in Vile Parle and other than NIIT, it was his place where I would explore all tech.
Do you really need a Google Drive Paid Upgrade?
Problem!
My Google account is more than a decade old now. 15 GB for free storage seemed absolutely fine until a few years back, when I started running short of storage space with lot of my storage lost to Google Photos. While per Google "High Quality" photos/videos are not counted against your storage space, if your photos/videos are not lucky enough to get auto-converted by "Google Backup and Sync" application to the "High Quality" format, the size of the files then get counted against your storage quota in Google Drive.
What did I do then?
I deleted some obsolete files. I then created a shared folder in my wife's Google Drive account and moved around 9 GB of archived files to the shared folder located in my wife's account.
DIY: Fixing Android "System Update" Boot Loops with Open DNS

Few days back I received a pop-up for Software Update for my 3 year old Lenovo Yoga Tab 3. This Tab is an excellent Tab having premium looks, finish and performance. This was probably the 2nd or 3rd update I have received over the years. While the previous updates went through smoothly, this update did not happen.

The system would always prompt for an update, auto-download it and start updating a little while later. The problem starts after the Tab reboots for update. After showing the progress bar for few minutes, the update crashes on the Recovery screen (as shown in the screen shot) with a "Status 7" error. While I wanted to investigate more on the error and fix it, I couldn't do as the ab would reboot to android, download the update, reboot and this went into a loop. After googling, found few solutions on disabling the "System Update" service, which unfortunately didn't work. Coming from a Network Admin background I realised that the best way to circumvent the System Update is to block the website from where the update is being downloaded.
DIY Home-made Hand Sanitizer

Due to the pandemic of Corona Virus, sale of Hand Sanitizers shot up. While trying to buy one for my family from Amazon, I ended up buying something which looked similar, but was a "Menthol perfumed Detton Disinfectant liquid". To ensure that my purchase doesn't go for a waste, I Googled and realised that making your own DIY Hand Sanitizer was really easy.
Ingredients -
1. Isopropyl Alcohol (99.9% pure).
2. Aloe Vera gel.
3. Essential Oils.
DIY: Making your RO Water Purifier compliant to Indian Laws
Around mid-2018 when my old water purifier conked off, I went for a RO Water Purifier (Livpure Pep Pro++) knowing that the water from RO tasted sweet to your tongue. However I hadn't done much research on water purification techniques and water quality of the supply that I received in my Mumbai home.
Background:
From around early 2018 the activities around water conservation and ground water recharge had increased in India. In addition to that the Indian Supreme Court introduced a ban on RO Water Purifier systems setting a baseline on the TDS parameters which should be considered before deciding to buy RO systems - https://www.financialexpress.com/india-news/ban-on-ro-systems-to-continue-in-delhi-supreme-court-declines-to-stay-ngt-order/1772112/ . The Supreme Court ruled that you need an RO system ONLY if the TDS is greater than 500 mg/litre (500 PPM).
Creating your UPI QR Code for easy FASTag Recharge
Let's accept the fact that we live in a world with QR codes. QR (Quick Response) codes have made our lives very simple.
So I thought of making lives simple for the frequent travellers across Toll Plazas, who will now need to recharge their FASTag's frequently.
My now many of us know that NPCI has made our lives easy by enabling FASTag recharges seamless by transferrring the recharge amount to the UPI ID/VPA as per your FASTag linked Bank. For example: netc.@
I thought of going 1 Step above to make thing more simple. How about creating a QR code for the UPI ID/VPA linked to your FASTag. I will continue with the example of Vehicle Number MH02AB1234, which is procured through HDFC Bank.
A FASTag which arrived SLOWly!
Around early Aug'19 the news of Fastag implementation on Indian Toll Plazas had just started popping up. Being an early technology adopter of Technology I did some research and finally applied for it around end of August on PayTM. The application process was pretty simple - provide your Vehicle's Registration Number, upload the pics of your Driving License and RC Book. I received an acknowledgement of the application with an estimated delivery date of approx. 2+ weeks from the date of application.

1st Episode: Till the date of delivery there is absolutely no notification from PayTM. I also see that a Fastag Wallet on PayTM is created for me. Just before the delivery day I receive a notification from PayTM that due to technical reasons my Fastag application couldn't be processed, without any further details provided. The notification told me that I can apply once again.

1st Episode: Till the date of delivery there is absolutely no notification from PayTM. I also see that a Fastag Wallet on PayTM is created for me. Just before the delivery day I receive a notification from PayTM that due to technical reasons my Fastag application couldn't be processed, without any further details provided. The notification told me that I can apply once again.
Your Smartphone laziness is increasing somebody's Business
With fall in Internet prices and more accessibility to Internet, the sale of Smartphones has also already increased. However the trend shows that most users of Smartphones whether IT savvy or not is probably not using it the right way. In spite of wide-scale popularity of Cloud-based Picture sharing services (like, Google Photos, Amazon Photos, Facebook, Instagram, etc.) and Video sharing services (like YouTube, Vimeo, Google Photos, Facebook, Instagram, etc.) only a handful of Smartphone users use the services in the most optimum way. Primarily WhatsApp and other messaging services have contributed to the larger problem of excessive data usage.

Instead of sharing Picture Albums, Video Albums and other Pictures/Videos through the popular Cloud-based Picture and Video sharing services, most Smartphone users still continue to forward content through WhatsApp. Smartphone users also don't change their default Camera settings to reduce the resolution. My experience says that a minimal 3 - 5 Megapixel still Photo and an HD 30 fps video is more than sufficient to watch on Phones, Tabs and large screens at Home/Office. Higher Picture resolution is only required if you really want to print a large Picture (like a Banner). This not only leads to a lot of spamming but increases the Bandwidth requirements and the Storage requirements of your Smartphone.
A 16 GB Smartphone which was more than sufficient for regular use a few years ago is no more sufficient and most users right now seek for 64 GB to 128 GB Storage on Phone and a 4G / 20 Mbps Broadband connection to have a smooth viewing experience. Its still not too late. A simple change in your lazy habits of blind Media forwarding can make a lot of difference.
DIY: Tutorial - Speed up your Notebook by migrating OS from HDD to SSD
In 2014 I bought an Intel i5 CPU based Asus Notebook with 4GB RAM and 1TB HDD. With Win 8.1 OS running the Notebook ran perfectly. Then came the Win 10 free upgrade, post which the Notebook dramatically slowed down. It would take almost 1 - 1.5 mins to login to Windows with all background Apps loaded. Also any resource hungry Multimedia Apps would load extremely slowly.
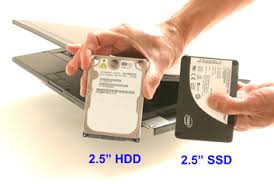
After hearing from few of my friends and watching some Youtube videos I learnt that you can dramatically speed-up your system not by just upgrading RAM or buying a new Notebook, but by migrating your existing Notebook's OS from a traditional magnetic HDD to a SSD.
While from the videos looked liked the migration was simple, I must admit that with the correct information and software the migration from HDD to SSD is really very smooth and seamless. I have now upgraded to a Samsung 250GB SATA III 860 EVO SSD. Believe me it now takes me little less than 15 secs to see my desktop with all background Apps loaded. My Windows experience has completely changed and I feel as if I am using an Ultrabook.
After hearing from few of my friends and watching some Youtube videos I learnt that you can dramatically speed-up your system not by just upgrading RAM or buying a new Notebook, but by migrating your existing Notebook's OS from a traditional magnetic HDD to a SSD.
While from the videos looked liked the migration was simple, I must admit that with the correct information and software the migration from HDD to SSD is really very smooth and seamless. I have now upgraded to a Samsung 250GB SATA III 860 EVO SSD. Believe me it now takes me little less than 15 secs to see my desktop with all background Apps loaded. My Windows experience has completely changed and I feel as if I am using an Ultrabook.
Indian Driving License Digitization, NOC & Renewal Process for new Smart Card License
While everybody thinks that you definitely need an Agent to convert your old booklet Driving License into a Smart Card and also to renew it, I took up a challenge this summer to check how the entire system works and was very pleased to get things smoothly done and also save some money. Rather than getting misguided by the Agents, you can follow the process below (as per your case) to get your old Booklet Driving License digitized, have NOC issued in old RTO and then apply for renewal and issuance of new Driving License.

Digitisation of Booklet DL (RTO Mumbai West - Andheri) [if your DL is not present on Central Repository] -
- Fill Offline Application Form 9 (Rs.5) along with copy of Driving License and original Driving License.
- Counter 19 closed. Counter 13 accepts form, verifies, signs and then sends to 1st Floor Assistant RTO - Hemant Patil - for 2nd sign.
- After sign of Assistant RTO Counter 13 verifies and sends to Counter 15 for submission.
- Counter 15 uploads data to Central Repository in 5-10 mins.
- Once the data is uploaded on Central Repository you can view your License details on the parivahan Portal and also add your DL on the DigiLocker App.
How to smartly use your Bluetooth Peripherals with Amazon Fire TV Stick
So you have a new Amazon Fire TV Stick and some Bluetooth Peripherals like the Sony Ericsson MW600 BT Headset or say the JBL Flip 2 Speakers, then you may want to smartly want to integrate them into your Fire TV ecosystem by paring them.
One of the best feature with the Fire TV Stick as compared to few of its competitors is the availability of Bluetooth. You can pair a new Bluetooth device by going to Settings -> Controller and Bluetooth devices -> Other Bluetooth devices -> Add Bluetooth Device.

I have paired 2 of my most used Bluetooth Peripherals and achieved the following -
 1. JBL Flip 3 Bluetooth Speakers - Once paired you can play music through any of the popular Fire TV Audio / Video apps and listen to the Music even by turning off your TV. It is also useful if you have a large room and watching a video where you need to carefully listen to some dialogue. Pairing with the BT speaker enables you to bring the Audio closer to you.
mAadhaar & Unlocking your Aadhaar Biometrics

We all now have to accept the fact that Aadhaar has become the defacto method used for e-KYC for Mobile subscriptions and many other e-commerce matters. The introduction of the mAadhaar App has also ensured that we can display our Aadhaar Card through our Smart Phones without carrying a physical copy of the Card. Very recently it is also being accepted as an ID proof for entry to Indian Airports.
 The mAadhaar App provides a unique feature / option to keep your Biometrics locked and only unlock it when you want to get yourself authorized for any kind of Aadhaar linked transactions. So if you have suddenly realized that your Aadhaar authentication was declined recently, its not due to your fingerprints (lol), but because your Biometrics are locked out.
The screenshot on the right (see bottom left hand corner) shows you how your mAadhaar App will display when your Biometrics are locked. On clicking "CLICK TO UNLOCK", your Biometrics will get unlocked for 10 mins, during which you can perform any number of Aadhaar related authorizations.
I learnt it the hard way when I had to spend 15 mins at Vodafone store without realizing why my Biometric authentication was getting declined.
While I have now got accustomed getting my Biometrics unlocked before I visit any store, the latest trouble is with heavy load on Aadhaar Servers. I faced a tremendous issue last Sunday while collecting my Jio Phone from Reliance Digital Express, since my Biometrics were not getting unlocked as the mAadhaar App kept flashing "Server Not Responding" or "Check your Internet connectivity".

Finally after applying some logic and looking across on Internet, I found that you can Unlock / Disable your Biometric lock directly from the UIDAI Biometric Link - https://resident.uidai.gov.in/biometric-lock .
So in future if you see that you are unable to unlock your Aadhaar Biometrics using the mAadhaar App, don't panic, just visit the Portal above. Login using your Aadhaar number and OTP, and post login you will find 2 options - either to temporarily UNLOCK your Biometric Lock (for 10 mins) or permanently DISABLE the Biometric Lock.
Tech Review: Logitech K480 Bluetooth Multi-Device Keyboard
My Notebook started to behave erratically from past few months and I was urgently looking out for some device which could help me in leveraging the existing Tab's which I had at home and give me a Notebook experience.

What better to use than Logitech's K480 Bluetooth Multi-Device Keyboard . I had been keenly tracking this product on e-commerce portal's from past few months and went I found a lightning deal (effective price of INR 1,600) on PayTM Mall, went for it.
While the device might look small on pics, it comes in the size of an A4 size paper. Mind you, though it might not be that sleek, but definitely after using this product for few days, you will fall in love with it. By using this Bluetooth Keyboard with an iPad you can surely get most of your Desktop Publishing jobs done.
Features & Pros -
1. Solid build quality and Sturdy.
2. Cradle with Silicone coating which can hold - 1 x iPad Mini + 1 x 5' Phone or 1 x iPad 9.7' or 1 x iPad 12'. While I speak about iPad, you can use any Tab of similar size.
3. Good Tactile Keys and sufficient space between keys reduces chances of mis-typing.
4. Can pair with devices of all known Platforms - Apple - iOS/MacOS, Android, ChromeOS and Windows.
5. Works with a pair of AAA batteries with advertised Battery life of 2 years.
6. Shortcut keys for Search, Home Screen, Frequent Apps, Media Control for all Platforms.
7. Dial Switch to connected with 1 of the 3 paired devices.
8. Dedicated keys to pair with with Androis/Windows/ChromeOS and iOS/MacOS.
9. A solid replacement for the soft touch On-Screen Keyboard to convert your Tab into a full-fledged PC.
10. Due to Dial Switch you can keep both a small Tab and your Phone on the cradle and switch typing from one device to another just by turning the dial.
Cons -
1. Power Switch at bottom.
2. Slightly heavy than expected.
3. Since this is a Bluetooth keyboard it will deplete the paired devices' Battery faster.
 You may also visit the link which I have shared above and understand all features in detail from Logitech's Portal. It comes in 2 x colors - Black and White. I bought both and gifted one to a friend. If you have a Silver iPad, I would suggest going for the White Keyboard and if you have the Space Grey iPad, I would suggest going for the Black Keyboard.
If you were always planning to go for a Bluetooth Keyboard, look no further. Get yourself a Logitech K480 this Diwali and share your feedback with me.
DIY: Custom-made Smart TV using non-functional Notebook Screen
Its that time when your old Notebook after repeated trouble, conks off and you discover that the Motherboard is fried and getting a new Motherboard is not the solution owing to the price.
I met with a similar fate last year my HP Pavilion DV6 Notebook (bought in 2011) died due to overheating of AMD processor. I then found out that rather than disposing off the Notebook for a cheap price you can re-use its functional parts, one among then was its HD LED screen. That's how it struck me to build a Smart TV out of the functional screen.
Method to build the TV -
1. You begin with first dismantling your Notebook and detaching the screen from the base (search on YoutTube to learn more on this for the specific model of your Notebook).
2. Now you need to remove the frame from the screen's bezel and carefully detach the LED screen. If you look at the back of the screen, you can find the screen's specific model number. In my case I had this screen with model number "AU Optronics B156XW02 V.2 HW4A Laptop LCD Screen 15.6 WXGA Glossy".

3. Now search "B156XW02 LED driver card" in Aliexpress. I had a seller who sold what I required. The kit consists of the LED Driver Board, 5 Key Keypad and LVDS cable (to connect to the screen). Just be sure to order the driver card specific to the screen model number, else your screen will not work and you may end up damaging your screen.
4. Once the LED Driver kit arrived, I detached the the old LVDS cable and connected the new LVDS cable with the LED screen and the LED driver board. I also attached the 5 Key Keypad with the LED driver board.
Adaptive approach towards Project Management
In today's fast-paced Business, Project Manager's play a pivotal role in the success and failure of projects. Theoretically Project Management encompasses multiple modules like Planning, Scheduling, Cost Management, Resource Management (and more..) and also involves various artifacts like Project Charter, Risk Register, Status Reports, etc. However when you talk of Project Management in IT, not all projects are of the same magnitude and complexity, and hence one needs to have an adaptive approach towards Project Management to fine tune the amount of efforts an assigned Project Manager / Delivery Project Manager spends in a project.
In today's projectized world working on a Global Delivery Model, you will generally find one or many of the following Project Mgmt related roles depending on the size of the projects -
1. Program Director.
2. Program Manager.
3. Lead Project Manager.
4. Regional Project Manager.
5. Project Coordinator.
6. Service Transition Manager.
Best Out of Waste - Legacy Peripherals as Raspberry Pi / Kodi Media Centre Remotes
I am pretty sure that at some point in time you feel like throwing off your old Keyboards, Mouse and other legacy Peripherals. But if you have just bought a Raspberry Pi like me, think again!
Your legacy input devices may turn out to be some useful remotes for Raspberry Pi Media Centre.
There are multiple tools through which you can have a Media Centre running on a Raspberry Pi - you have OSMC, OpenElec and LibreElec. While they all sound different, they eventually turn out to be Operating Systems to run the main Media Centre Application named KODI (earlier known as "XBMC").
OSMC and LibreElec are offered as part of the NOOBS menu(multi-boot OS loader for Raspberry Pi). I tried out both OSMC and LibreElec but finally settled with LibreElec as I found it to more lightweight and fast as compared to OSMC.

While you can use a USB Keyboard and Mouse (or a Wireless USB Keyboard and Mouse) to do the main LibreElec setup, but once all's done, you will no more require a Keyboard to operate it. In this post I share with you my experience about re-purposing legacy peripherals as remotes to operate the Media Centre.
Selecting the right Case, Power Adapter and GPIO Cable for Raspberry Pi 3
While my last post on Raspberry Pi 3 was mainly aimed towards making a custom-made Case to begin your initial Pi 3 setup, in this post I would share my experience on selecting the right Case, Charger and GPIO Cable for the Pi.
1. Case -
Pi 3 being a niche product, its difficult to find a case in a nearby Electronic store and hence you are left to choose only from the e-commerce portals like eBay, Snapdeal, FlipKart, etc. Though there are numerous options available online, you need to concentrate on some key features before you order the case -

- Availability of a Cooling Fan and Heat Sink - While many in the forums would say that you neither need a fan or heat sink, but after having experimented with the Pi 3 for nearly a week now I would say that it is always recommended to have both to keep the Pi 3 running cool. I found the idle temperatures of the Pi 3 without fan + heat-sink in Indian conditions to over around 45 - 50 deg C. Post using fan + heat-sink, the idle temperatures are found around 38 - 42 deg C. I would say that the fan + heat-sink cools the Pi 3 by almost 10 deg C
- Access to GPIO Pins - As you know that the Pi 3 is not just meant for Server-based computing but also for Robotics and other Engineering projects, hence a case which provides easy access to the GPIO pins without compromising the protection of the Pi 3 board is required
- (Optional) Access to the On-board Camera Port - Similar to the GPIO pins, a case with easy access to the Camera Port is preferable. But this is only required if you plan to buy a Camera manufactured for Pi
- Easy mounting case - A case where the Pi 3 board can fit with minimal screws
After keeping in mind all the above key features I went for the Case shown above bought from Amazon.
Subscribe to:
Posts (Atom)