
With every firmware upgrade things went from bad to worse and other than the 2.4GHz stability issue, I also started facing issues with QoS, DDoS filtering and LAN access. Though the Router was under warranty I decided last night to go with the OpenWRT route. Though OpenWRT is a reputed non-OEM firmware, it did not have Cloud support for my Router. So with some experiments conducted on my RaspberryPi, I decided to make the Router an IoT device and install IoT services through which I could manage the Router from the cloud. Please go through the detailed instructions below if you want to make your Router an OpenWRT Cloud Router. Do keep in mind that you will loose product warranty for not using OEM firmware (though you can restore back to OEM firmware later on if required). You should also ensure that you have a Wi-Fi Router with sufficient on-board memory to support OpenWRT and other additional packages that need to be installed.
(DISCLAIMER: This Blog post is meant for the geeks who have good command over Linux and are able to fix issues encountered during the upgrade process. Though the instructions below have worked smoothly for me, you need to ensure that you have the correct knowledge to do any required troubleshooting and perform this upgrade. I also assume that you have basic knowledge of 3rd Party firmware upgrade process and exposure Remote.it IoT services. Please read other associated documentation before performing the below steps.)
Upgrade from TP-Link to OpenWRT firmware
1. Check your TP-Link Archer C6 firmware version from the Web Interface:

2. Download the latest firmware’s of OpenWRT (2 files):
a. openwrt-19.07.5-ath79-generic-tplink_archer-c6-v2-squashfs-factory.bin
b. openwrt-19.07.5-ath79-generic-tplink_archer-c6-v2-squashfs-sysupgrade.bin
** DO NOT FORGET TO CONNECT AN ETHERNET CABLE AND TURN-OFF YOUR LAPTOP’S WI-FI DURING ANY FIRMWARE UPGRADE PROCESS **
3. For original TP-Link firmware versions 1.3.4 and higher, you can directly upgrade through the web interface (Ref: https://openwrt.org/toh/tp-link/tp-link_archer_c6_v2 ).
4. For the rest you need to follow the procedure mentioned under “Flash using TFTP recover”.
5. For firmware mentioned in Point 3, you need to do a “Manual Upgrade” on your original firmware 1st using the “openwrt-19.07.5-ath79-generic-tplink_archer-c6-v2-squashfs-factory.bin” file (no change in filename required).
6. Once the base OpenWRT firmware is installed you can login to the Web Interface through http://192.168.1.1 and using root/password as the credentials and then installing the sysupgrade firmware (openwrt-19.07.5-ath79-generic-tplink_archer-c6-v2-squashfs-sysupgrade.bin) from the menu “System -> Backup / Flash Firmware”. 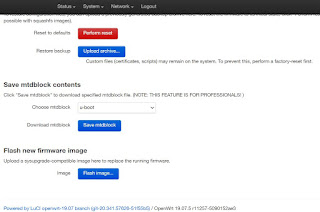
7. You now have a fully functional OpenWRT firmware.
Installing “remote.it” IoT service for cloud management of the device
Remote.it provides interesting IoT services through which you can manage your IoT devices like RaspberryPi and other low power devices like OpenWRT-based routers. Please visit Remote.it for further details.
1. Update your OpenWRT packages:
root@ OpenWRT-ArcherC6:~# opkg update
Downloading http://downloads.openwrt.org/releases/19.07.5/targets/ath79/generic/packages/Packages.gz
Updated list of available packages in /var/opkg-lists/openwrt_core
Downloading http://downloads.openwrt.org/releases/19.07.5/targets/ath79/generic/packages/Packages.sig
Signature check passed.
Downloading http://downloads.openwrt.org/releases/19.07.5/targets/ath79/generic/kmods/4.14.209-1-b84a5a29b1d5ae1dc33ccf9ba292ca1d/Packages.gz
Updated list of available packages in /var/opkg-lists/openwrt_kmods
Downloading http://downloads.openwrt.org/releases/19.07.5/targets/ath79/generic/kmods/4.14.209-1-b84a5a29b1d5ae1dc33ccf9ba292ca1d/Packages.sig
Signature check passed.
Downloading http://downloads.openwrt.org/releases/19.07.5/packages/mips_24kc/base/Packages.gz
Updated list of available packages in /var/opkg-lists/openwrt_base
Downloading http://downloads.openwrt.org/releases/19.07.5/packages/mips_24kc/base/Packages.sig
Signature check passed.
Downloading http://downloads.openwrt.org/releases/19.07.5/packages/mips_24kc/freifunk/Packages.gz
Updated list of available packages in /var/opkg-lists/openwrt_freifunk
Downloading http://downloads.openwrt.org/releases/19.07.5/packages/mips_24kc/freifunk/Packages.sig
Signature check passed.
Downloading http://downloads.openwrt.org/releases/19.07.5/packages/mips_24kc/luci/Packages.gz
Updated list of available packages in /var/opkg-lists/openwrt_luci
Downloading http://downloads.openwrt.org/releases/19.07.5/packages/mips_24kc/luci/Packages.sig
Signature check passed.
Downloading http://downloads.openwrt.org/releases/19.07.5/packages/mips_24kc/packages/Packages.gz
Updated list of available packages in /var/opkg-lists/openwrt_packages
Downloading http://downloads.openwrt.org/releases/19.07.5/packages/mips_24kc/packages/Packages.sig
Signature check passed.
Downloading http://downloads.openwrt.org/releases/19.07.5/packages/mips_24kc/routing/Packages.gz
Updated list of available packages in /var/opkg-lists/openwrt_routing
Downloading http://downloads.openwrt.org/releases/19.07.5/packages/mips_24kc/routing/Packages.sig
Signature check passed.
Downloading http://downloads.openwrt.org/releases/19.07.5/packages/mips_24kc/telephony/Packages.gz
Updated list of available packages in /var/opkg-lists/openwrt_telephony
Downloading http://downloads.openwrt.org/releases/19.07.5/packages/mips_24kc/telephony/Packages.sig
Signature check passed
2. Install the curl package:
root@ OpenWRT-ArcherC6:~# opkg install curl
Installing curl (7.66.0-3) to root...
Downloading http://downloads.openwrt.org/releases/19.07.5/packages/mips_24kc/base/curl_7.66.0-3_mips_24kc.ipk
Installing libmbedtls12 (2.16.8-1) to root...
Downloading http://downloads.openwrt.org/releases/19.07.5/packages/mips_24kc/base/libmbedtls12_2.16.8-1_mips_24kc.ipk
Installing ca-bundle (20200601-1) to root...
Downloading http://downloads.openwrt.org/releases/19.07.5/packages/mips_24kc/base/ca-bundle_20200601-1_all.ipk
Installing libcurl4 (7.66.0-3) to root...
Downloading http://downloads.openwrt.org/releases/19.07.5/packages/mips_24kc/base/libcurl4_7.66.0-3_mips_24kc.ipk
Configuring libmbedtls12.
Configuring ca-bundle.
Configuring libcurl4.
Configuring curl.
3. Now download the remoteit auto-install script:
root@OpenWRT-ArcherC6:~#curl -LkO https://raw.githubusercontent.com/remoteit/installer/master/scripts/auto-install.sh
% Total % Received % Xferd Average Speed Time Time Time Current
Dload Upload Total Spent Left Speed
100 12956 100 12956 0 0 13370 0 --:--:-- --:--:-- --:--:-- 13841
You might encounter some minor errors, which you can temporarily ignore
4. Now make the autoinstall.sh script executable and run the script:
root@OpenWRT-ArcherC6:~# chmod +x ./auto-install.sh
root@OpenWRT-ArcherC6:~# ./auto-install.sh
********************************************************
remote.it platform and binary tester version 2.5.38
Current directory /root
Thu Dec 17 04:28:35 IST 2020
********************************************************
Linux OpenWRT-ArcherC6 4.14.209 #0 Sun Dec 6 07:31:03 2020 mips GNU/Linux
Detected architecture is mips
using tar file installer...
Downloading and testing connectd.mips-24kec...
.
Downloading and testing connectd.mips-24kec-musl...
.
Downloading and testing connectd.mips-34kc...
.
Downloading and testing connectd.mips-gcc-4.7.3...
.
Downloading and testing connectd.mipsel-bmc5354...
.
Downloading and testing connectd.mipsel-gcc342...
.
Downloading and testing connectd.mips-24kec_static...
.
Downloading and testing connectd.mips-34kc_static...
Looks compatible.
connectd.mips-34kc_static is compatible!
Downloading and testing muxer.mips-34kc_static...
Downloading and testing demuxer.mips-34kc_static...
0
-rw-r--r-- 1 root root 634880 Dec 17 04:29 connectd_2.5.38_mips-34kc_static.tar
We downloaded the file connectd_2.5.38_mips-34kc_static.tar to the current folder.
As root, or using sudo, move this file to the / folder.
e.g.
mv connectd_2.5.38_mips-34kc_static.tar /
Now switch folders to the / folder, e.g.
cd /
Then extract the files to your system with the following command:
tar xvhf connectd_2.5.38_mips-34kc_static.tar
5. The remoteit services are controlled through the connectd daemon. The connectd package will now download connectd_2.5.38_mips-34kc_static.tar
6. Execute the following commands to install connectd:
root@OpenWRT-ArcherC6:~# mv connectd_2.5.38_mips-34kc_static.tar /
root@OpenWRT-ArcherC6:~# cd /
root@OpenWRT-ArcherC6:/# tar xvhf connectd_2.5.38_mips-34kc_static.tar
usr/
usr/share/
usr/share/doc/
usr/share/doc/connectd/
usr/share/doc/connectd/connectd.pi.man.gz
usr/share/doc/connectd/changelog.gz
usr/share/doc/connectd/copyright
usr/share/connectd/
usr/share/connectd/scripts/
usr/share/connectd/scripts/connectd_start.add
usr/share/connectd/scripts/connectd_launch
usr/share/connectd/scripts/connectd_stop
usr/share/connectd/scripts/connectd_start_all
usr/bin/
usr/bin/connectd_schannel_link
usr/bin/connectd_start
usr/bin/connectd_options
usr/bin/connectd_schannel.mips-34kc_static
usr/bin/connectd_mp_configure
usr/bin/connectd.mips-34kc_static
usr/bin/connectd_library
usr/bin/connectd_installer
usr/bin/connectd_save_config
usr/bin/connectd_json
usr/bin/connectd_stop_all
usr/bin/connectd_schannel
usr/bin/connectd
usr/bin/connectd_control
usr/bin/connectd_wlib
usr/bin/connectd_d2d
usr/bin/connectd_task_notify
usr/bin/connectd_register
usr/bin/connectd_stop
usr/bin/connectd_claimcode
etc/
etc/connectd/
etc/connectd/builddate.txt
etc/connectd/oem_settings
etc/connectd/registration_key.txt
etc/connectd/bulk_identification_code.txt
etc/connectd/hardware_id.txt
etc/connectd/schannel.conf
lib/
lib/systemd/
lib/systemd/system/
lib/systemd/system/connectd_schannel.service
lib/systemd/system/connectd.service
7. Since the files referenced during servicestart-up is slightly different in OpenWRT as compare to a traditional Debian / Ubuntu system, we need to make some minor tweaks. The connectd 2.4.26 package assumes that the target operating system uses systemd for startup and shutdown of services. However, OpenWRT uses init.d instead. To make services installed onto init.d based systems such as OpenWRT, create the following file (Ref: https://forum.remote.it/t/onion-omega2s-remote-it-openwrt/148/2 ):
root@OpenWRT-ArcherC6:/# vi /etc/init.d/connectd
#!/bin/sh /etc/rc.common
# connectd startup script for init.d based systems
START=90
STOP=10
start() {
echo starting connectd
/usr/bin/connectd_start_all
/usr/bin/connectd_schannel start
}
stop() {
echo stopping connectd
/usr/bin/connectd_stop_all
/usr/bin/connectd_schannel stop
}
root@OpenWRT-ArcherC6:/etc/init.d# chmod +x connectd
Finally, enable the command to run at startup:
root@OpenWRT-ArcherC6:/etc/init.d# service connectd enable
root@OpenWRT-ArcherC6:/etc/init.d# service connectd start
root@OpenWRT-ArcherC6:/etc/init.d# opkg update
Following is the method to add SSH service using the connectd_installer:
root@OpenWRT-ArcherC6:/# connectd_installer
remote.it connection installer Version: 2.5.38 lib_v2.1.26
Modified: June 10, 2020 (library) November 10, 2020
Build date: Thu Nov 12 18:13:42 UTC 2020
curl with SSL support installed.
Checking the daemon for compatibility...
Using architecture mips-34kc_static...
Checking your network for compatibility...
Network connection OK...
Your network is compatible with remote.it services.
********************* Sign In Menu *********************
1) Sign in to your remote.it account
2) Exit
********************************************************
Choose a menu selection (1 - 2):
1
Please enter your remote.it Username (e-mail address):
<<remoteit.username>>
Please enter your remote.it password:
<<remoteit.password>>
.
..
==========================================
Allocated UID: 72:01:00:02:00:05:34:78.
..
Enter a name for your device (e.g. my_Pi_001).
The Device Name identifies your device in the remote.it portal.
Your services will be grouped under the Device Name.
Only letters, numbers, underscore, space and dash are allowed.
tpl-openwrt-ac6
.
Registering tpl-openwrt-ac6
.......
========================= Installed remote.it Services ======================
Service Name | Protocol | LAN Address | Port | Application
-------------------------------------------------------------------------------
-------------------------------------------------------------------------------
Device Name: tpl-openwrt-ac6 Platform: mips-34kc_static
Hardware ID: 41:e7:2c:36:67:78-DO678tLo78YabI19ZaHA
============================ Main Menu ============================
1) Attach/reinstall a remote.it Service to an application
2) Attach/reinstall a remote.it Service to a LAN application
3) Remove a remote.it Service from an application
4) Remove all remote.it Services, then exit
5) Exit
===================================================================
'application' is any TCP service (e.g. SSH, VNC, HTTP, etc.)
running on this device. 'LAN application' is a TCP service
running on another device on this LAN.
===================================================================
Choose a menu selection (1 - 5):
1
*********** Protocol Selection Menu ***********
1) SSH on port 22
2) Web (HTTP) on port 80
3) Secure Web (HTTPS) on port 443
4) VNC on port 5900
5) nxWitness on port 7001
6) Samba (SMB) on port 445
7) Remote Desktop (RDP) on port 3389
8) NextCloud on port 443
9) OpenVPN on port 1194
10) Custom (TCP)
11) Return to previous menu
***********************************************
You can change the port value during install
***********************************************
Choose a menu selection (1 - 11):
1
The default port for SSH is 22.
Would you like to continue with the default port assignment? [y/n]
y
We will attach a remote.it Service to the following Application:
Protocol: ssh
Port #: 22
.
....
==========================================
Allocated UID: 72:01:00:02:00:05:34:79.
..
Enter a name for this remote.it service (e.g. ssh-Pi).
This name will be shown in your remote.it Service List.
Only letters, numbers, underscore, space and dash are allowed.
ssh-AC6
.
Registering ssh-AC6
.......
========================= Installed remote.it Services ======================
Service Name | Protocol | LAN Address | Port | Application
-------------------------------------------------------------------------------
ssh-AC6 | SSH | localhost | 22 | OK: dropbear
-------------------------------------------------------------------------------
Device Name: tpl-openwrt-ac6 Platform: mips-34kc_static
Hardware ID: 41:e7:2c:36:67:78-DO678tLo78YabI19ZaHA
============================ Main Menu ============================
1) Attach/reinstall a remote.it Service to an application
2) Attach/reinstall a remote.it Service to a LAN application
3) Remove a remote.it Service from an application
4) Remove all remote.it Services, then exit
5) Exit
===================================================================
'application' is any TCP service (e.g. SSH, VNC, HTTP, etc.)
running on this device. 'LAN application' is a TCP service
running on another device on this LAN.
===================================================================
Choose a menu selection (1 - 5):
5
Are you sure you want to exit? [y/n]
y
10. You can repeat the commands in Point 8 to add HTTP service for your Router gainst our remote.it account.
11. You now have a robust TP-Link Archer C6 Router with OpenWRT firmware and accessible over Cloud through SSH and HTTP access via the remote.it IoT services.
** OPTIONAL: Scripts to toggle Internet Connection LED from AMBER to GREEN
In case you want to control the Internet Connection LED state by toggling it from AMBER to GREEN (depending on the connected state), you can use these simple scripts -
- Delete WAN LED setting in System-LED
- Create 3 scripts in /usr/bin and make them executable
check.sh
#!/bin/sh
#
ping -q -w 4 -c 1 8.8.8.8 && /usr/bin/internet-on.sh || /usr/bin/internet-off.sh
internet-on.sh
#!/bin/sh
#
/bin/echo "255" > /sys/class/leds/tp-link:green:wan/brightness
/bin/echo "0" > /sys/class/leds/tp-link:amber:wan/brightness
internet-off.sh
#!/bin/sh
#
/bin/echo "0" > /sys/class/leds/tp-link:green:wan/brightness
/bin/echo "255" > /sys/class/leds/tp-link:amber:wan/brightness
root@OpenWRT-ArcherC6:/usr/bin# chmod +x check.sh
root@OpenWRT-ArcherC6:/usr/bin# chmod +x internet-on.sh
root@OpenWRT-ArcherC6:/usr/bin# chmod +x internet-off.sh
- Create following task in cron and save it / or add the entry (to be added to crontab) in Scheduled Tasks:
root@OpenWRT-ArcherC6:/usr/bin# #crontab - e
crontab
*/1 * * * Mon,Tue,Wed,Thu,Fri,Sat,Sun /usr/bin/check.sh
NOTE: I also understand that TP-Link Archer C50 AC1200 Wi-Fi Router also has similar Hardware and similar issues, but it lacks Cloud support. So you may also want to try out with that Router too.
Do share your feedback once you have been successful in fixing this nagging issue of TP-Link Archer C6.
No comments:
Post a Comment