In 2014 I bought an Intel i5 CPU based Asus Notebook with 4GB RAM and 1TB HDD. With Win 8.1 OS running the Notebook ran perfectly. Then came the Win 10 free upgrade, post which the Notebook dramatically slowed down. It would take almost 1 - 1.5 mins to login to Windows with all background Apps loaded. Also any resource hungry Multimedia Apps would load extremely slowly.

After hearing from few of my friends and watching some Youtube videos I learnt that you can dramatically speed-up your system not by just upgrading RAM or buying a new Notebook, but by migrating your existing Notebook's OS from a traditional magnetic HDD to a SSD.
While from the videos looked liked the migration was simple, I must admit that with the correct information and software the migration from HDD to SSD is really very smooth and seamless. I have now upgraded to a Samsung 250GB SATA III 860 EVO SSD. Believe me it now takes me little less than 15 secs to see my desktop with all background Apps loaded. My Windows experience has completely changed and I feel as if I am using an Ultrabook.
Without wasting any further time let me explain to you the process.
Tools and Software required -
1. Philips screwdriver and an old expired Credit/Debit card to open your Notebook.
2. New HDD Caddy to replace your existing DVD-ROM Caddy with SSD drive.
3. Minitool (also available as "EaseUS") Partition Wizard to facilitate the migration of OS from HDD to SSD.
4. USB 2.0 to 7 6 13Pin Slimline SATA Adapter Cable.
5. SSD Activation and Optimisation software Samsung Magician Software available from samsung.com/magician or from Alternate Google Search.
Disassembly Process -
1. Remove the screws from your Notebook and use the expired Plastic card to detach the cover to access your Notebook's motherboard.
2. Look into the location of your DVD-ROM Caddy and locate the screw which attaches the Caddy with the motherboard. Now remove the screw and detach the DVD-ROM Caddy from the Notebook.
3. Now measure the thickness of your DVD-ROM Caddy. It will either be a 9.5mm slim one or a standard 12.7mm one.

4. You need to order your HDD Caddy based on the thickness you find in Point 3. You also need to order a USB to SATA Slimline Port Adaptor so that yo can continue to use your Notebook's Internal DVD-ROM as an external DVD-ROM after the migration process.
5. Carefully remove the Faceplate (the plastic cover with Button on the DVD-ROM tray) and attach it to the new HDD Caddy. This step is important since the Faceplates are designed based on your Notebooks Design and molding. Attaching the Faceplate to the new HDD Caddy will ensure that the Notebook looks the same externally even after exchanging the DVD-ROM Caddy with the HDD Caddy.

5. Now insert your new Samsung SSD into the HDD Caddy and Fix it in the DVD-ROM Caddy Slot and screw it back to the motherboard.
6. Fix all the screws in Notebook and close bottom cover.
Migration Process -
1. Install Samsung Magician software and activate your SSD.
2. Install MiniTool Partition Wizard.
 3. Run the Minitool Partition Wizard and in the main screen select "Migrate OS to SSD/HDD".
4. Now select "B. I would like to move my operating system.........". I selected this option because my original HDD had OS loaded in "C:\" and all data was stored on "D:\". What I would like to do is migrate the OS and all System Partitions, so that I can boot from the SSD and continue to use my old HDD for Data.
 5. Now when you click next you can an option to resize the Partitions in the new SSD. This is because in my case my System Drive - C:\ was around 300GB but the OS and Program Files used only around 70GB. Other than my OS Parition I also had other System Partitions like UEFI (for Boot) and also RECOVERY Partition. Other than my OS Partition rest of my Partitions were only occupying 20GB in total. So I selected a resize option where the size of OS Parition - C:\ will be Total SSD size minus total size of other Partitions. I then replicate the rest of the System Partitions as it is. Now click "Apply" in the main screen for the Tool to commence the migration process. The Tool may prompt you to reboot as some System files may be in use. On rebooting, the Tool continues the migration process by creating all the required System Partitions and then copying the files.
6. Once the entire migration process is completed it prompts you to restart again. Now you need to enter your System BIOS and select to Boot from the "Windows Boot Manager" installed from your new SSD rather than from your old HDD.
7. Now you will see the dramatic change when you Boot. Without loosing any changes in settings you are straightaway taken to your desktop. What impressed me most is that the Tool removes the Partition label of your previous C:\ drive and hence you find that your old Data Drive - D:\ retains its label. This ensures that your migration is seamless.
8. You now need to load the MiniTool once again and select the option to Hide all the System Partitions like "UEFI", "RESTORE", "RECOVERY" which were created as part of the migration process. Hit "Apply" once again to apply the changes.
9. You can now run Samsung Magician and go to the Tab "Over Provisioning" (OP) and select OP on your SSD to increase SSD drive. Also ensure to move the Win 10 Pagefile from Windows System Performance option from the SSD to HDD. This will also increase your SSD's longevity.
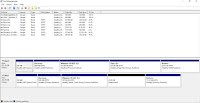
9. Here are some screenshots of my Notebooks Partitions before and after migration -


10. The migration process is now complete. You can attach your Internal DVD-ROM Caddy with your Notebook's USB Port using the USB 2.0 to 7 6 13Pin Slimline SATA Adapter Cable.
With my detailed instructions in this Tutorial I am quite confident that you will try to DIY to speed up your Notebook rather than approaching a Hardware vendor for their service.
Do leave your comments and feedback.
After hearing from few of my friends and watching some Youtube videos I learnt that you can dramatically speed-up your system not by just upgrading RAM or buying a new Notebook, but by migrating your existing Notebook's OS from a traditional magnetic HDD to a SSD.
While from the videos looked liked the migration was simple, I must admit that with the correct information and software the migration from HDD to SSD is really very smooth and seamless. I have now upgraded to a Samsung 250GB SATA III 860 EVO SSD. Believe me it now takes me little less than 15 secs to see my desktop with all background Apps loaded. My Windows experience has completely changed and I feel as if I am using an Ultrabook.
Without wasting any further time let me explain to you the process.
Tools and Software required -
1. Philips screwdriver and an old expired Credit/Debit card to open your Notebook.
2. New HDD Caddy to replace your existing DVD-ROM Caddy with SSD drive.
3. Minitool (also available as "EaseUS") Partition Wizard to facilitate the migration of OS from HDD to SSD.
4. USB 2.0 to 7 6 13Pin Slimline SATA Adapter Cable.
5. SSD Activation and Optimisation software Samsung Magician Software available from samsung.com/magician or from Alternate Google Search.
Disassembly Process -
1. Remove the screws from your Notebook and use the expired Plastic card to detach the cover to access your Notebook's motherboard.
2. Look into the location of your DVD-ROM Caddy and locate the screw which attaches the Caddy with the motherboard. Now remove the screw and detach the DVD-ROM Caddy from the Notebook.
3. Now measure the thickness of your DVD-ROM Caddy. It will either be a 9.5mm slim one or a standard 12.7mm one.
4. You need to order your HDD Caddy based on the thickness you find in Point 3. You also need to order a USB to SATA Slimline Port Adaptor so that yo can continue to use your Notebook's Internal DVD-ROM as an external DVD-ROM after the migration process.
5. Carefully remove the Faceplate (the plastic cover with Button on the DVD-ROM tray) and attach it to the new HDD Caddy. This step is important since the Faceplates are designed based on your Notebooks Design and molding. Attaching the Faceplate to the new HDD Caddy will ensure that the Notebook looks the same externally even after exchanging the DVD-ROM Caddy with the HDD Caddy.

5. Now insert your new Samsung SSD into the HDD Caddy and Fix it in the DVD-ROM Caddy Slot and screw it back to the motherboard.
6. Fix all the screws in Notebook and close bottom cover.
Migration Process -
1. Install Samsung Magician software and activate your SSD.
2. Install MiniTool Partition Wizard.
 3. Run the Minitool Partition Wizard and in the main screen select "Migrate OS to SSD/HDD".
4. Now select "B. I would like to move my operating system.........". I selected this option because my original HDD had OS loaded in "C:\" and all data was stored on "D:\". What I would like to do is migrate the OS and all System Partitions, so that I can boot from the SSD and continue to use my old HDD for Data.

6. Once the entire migration process is completed it prompts you to restart again. Now you need to enter your System BIOS and select to Boot from the "Windows Boot Manager" installed from your new SSD rather than from your old HDD.
7. Now you will see the dramatic change when you Boot. Without loosing any changes in settings you are straightaway taken to your desktop. What impressed me most is that the Tool removes the Partition label of your previous C:\ drive and hence you find that your old Data Drive - D:\ retains its label. This ensures that your migration is seamless.
8. You now need to load the MiniTool once again and select the option to Hide all the System Partitions like "UEFI", "RESTORE", "RECOVERY" which were created as part of the migration process. Hit "Apply" once again to apply the changes.
9. You can now run Samsung Magician and go to the Tab "Over Provisioning" (OP) and select OP on your SSD to increase SSD drive. Also ensure to move the Win 10 Pagefile from Windows System Performance option from the SSD to HDD. This will also increase your SSD's longevity.
9. Here are some screenshots of my Notebooks Partitions before and after migration -


10. The migration process is now complete. You can attach your Internal DVD-ROM Caddy with your Notebook's USB Port using the USB 2.0 to 7 6 13Pin Slimline SATA Adapter Cable.
With my detailed instructions in this Tutorial I am quite confident that you will try to DIY to speed up your Notebook rather than approaching a Hardware vendor for their service.
Do leave your comments and feedback.
No comments:
Post a Comment