Single Sign On (SSO) with OpenID

OpenID has been into existence from quite sometime but I thought of discussing the same looking into its growing popularity & acceptance across the Internet community. This post is mainly dedicated to those people who are absolutely clueless about this Open Authentication Protocol & those who have heard of it, but haven't explored much on the same. Single Sign On (SSO) with OpenID is actually Single Set of Authentication Credentials rather than the true SSO scenario used on Corporate Intranet applications, where the user needs to login to the application only once & get authenticated multiple times by other SSO supported applications.

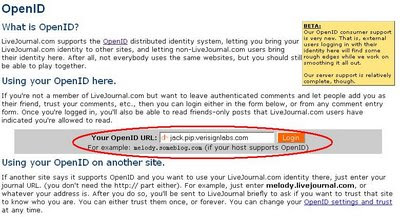
The best place to know about OpenID is by looking onto Wikipedia or by visiting the OpenID Home Page. In short, OpenID enables users to use a single set of authentication credentials (Username & Password) across multiple Portals supporting OpenID authentication. Trying to find an anology, you can relate OpenID to authentication services similar to Active Directory used in Corporate Networks. OpenID is in the form of a URL which would contain a Username in conjunction with the domain which is providing the OpenID services. Surprisingly, you might already have an OpenID & might not have realised the same. To know whether you already have an OpenID check here. There are many Sites which offer OpenID's as an add-on service & there are few Sites which dedicatedly provide this service as a primary service. Yesterday I registered with one of such site & thought of sharing more info on the same. It is managed by one of the most trusted Certifying Authorities (CA) - VersSgn. For registering an OpenID in this you need to register at https://pip.verisignlabs.com . Once registered, your OpenID URL would be username.pip.verisignlabs.com & the same URL can be used across any Site supporting OpenID authentication. For eg, www.livejoournal.com supports OpenID & hence if my username is jack at pip.versignlabs.com, I can use jack.pip.versignlabs.com as the OpenID URL. Check the screenshot below -
This was all about the basics of OpenID. I would now talk about some Value Added Services provided by VerSignlabs. Once you login to their Portal, on the right hand side you would find the section of Links. Out of them the most interesting of them is One-Click Sign in which enables you to do a Single Sign On (SSO) to a list of sites supported by VeriSign Labs. The procedure to do a One-Click Sign In can be found here. In short, to enable One-Click Sign in, a VeriSign Labs user needs to store the authentication credentials of all the accounts on the Internet, supported by VeriSign Labs. Check the screenshot below -

To make One-Click Sign in work, the user needs to install a Bookmark in the browser which is protected using a One-Click Key.

For getting authenticated in any site added in the One-Click Sign in screen, the user has to visit the login page of the site & click on the Browser Bookmark. If the user is already signed on to pip.verisignlabs.com, the username & password in the site would get auto-populated by One-Click Sign in & the user will get automatically logged on to the site. Check the screenshot below -
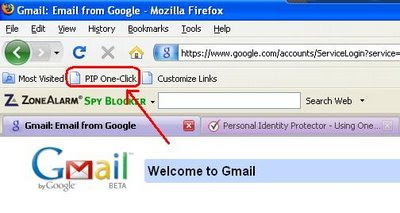
If the user has not got authenticated by pip.versignlabs.com, then the site would prompt you to enter your OpenID & Password. Once logged on to pip.versignlabs.com, your OpenID One-Click Sign in remains valid until you close your Browser.

In addition to One-Click Sign in bookmark, one can also install the VeriSign Labs Firefox Extension, called SeatBelt, which shows the authentication status at your pip.versignlabs.com. A green status indicates Logged out & a red status with username indicates Logged in.

VeriSign Labs also provides you FREE Browser Certificate for added security. You can also pay as low as 5$ & get a Security Key to have an extra layer of account protection. Aren't all these features pretty interesting?

Why don't you register today!!!


Sync your Browser's Stored Passwords & Bookmarks using Foxmarks

First it was Bookmarks, now its Browser Passwords too. What am I talking about ? Its about the new updated version of Firefox's plugin, Foxmarks 2.5.3. Do install it now & enjoy the freedom of seamless & secure Bookmark & Browser Password synchronisation across your Home PC, Laptop, Mobile, etc. For detailed feature list click here.

Keep your Cell Phone's Contacts & Calendar Synced with ZYB

Say bye bye to loosing your Contacts / Calendar data due to loss of your Cell Phone or a Cell Phone crash. ZYB is here.

I have lately discovered this useful Mobile Social Networking site which also doubles up as your Cell Phone's Contact & Calendar backup system. The best part is currently its offered FREE of cost.

Rather than describing more on the Social Networking features I would concentrate & brief you about how to configure the ZYB on your Cell Phone -
  1. Currently it supports Syncing of Contacts & Calendar data.
  2. To Sync your data, it first gathers your active Cell Phone number & SMS'es you the Configuration settings.
  3. Once the Configuration settings are saved onto your Phone, you can Sync your Phones Contact & Calendar data by choosing ZYB from the listed Sync Profiles on your Phone.
  4. It provides a very useful web-based feature to track duplicate Contact details on your Cell Phone. So if you have there are two entries of the same name - one containing the Cell Phone number & the other containing the Landline number, ZYB would suggest you to consolidate both these entries. It would also suggest you to delete an entry if it exists more than once.
  5. ZYB automatically scans the uploaded Contacts & prompts you to connect with your friends who are already registered on ZYB's server. It does this by matching the Cell Phone number of your Contact uploaded with any registered users' Cell Phone number.
Aren't all these features really interesting. I now find Syncing my Contacts more easily done using ZYB rather than my Nokia PC Suite, as this can be done anytime, anywhere; even if I am not connected to my PC. I now feel that my Contacts & Calendar data are safe & secure using ZYB. I also read that Vodafone has acquired this company. So you can expect more wonders to be released soon.

I am still exploring this site. In the meantime why don't you activate your GPRS connection & stay Synced with ZYB!!!

emoze 2.0(70) incompatibility with Nokia 6110 Navigator

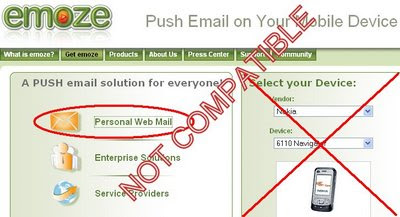
After 2 days of vigorous tweaking on my Nokia 6110 Navigator with the latest version of emoze 2.0 Push Mail application, I have finally decided to declare that the latest version of my favourite Push Mail application is not completely compatible with Nokia 6110 Navigator.

It all started from day before yesterday when my older version of emoze, v1.50(11), started popping up the error "Please verify your GMail credentials". I had been using emoze from past 8-10 months without any problems. I had infact forwarded almost all my e-mail accounts to GMail where I had a consolidated list of all my mails.

After facing the authentication problem I tweaked a couple of times & finally ended browsing the emoze Portal for an updated version. I downloaded emoze2_s60_91.sisx after selecting Nokia 6110 Navigator from the menu & also installed emoze 2.0 to my cell. Initially I was very excited to find few new to the updated version, but my excitement was shortlived. I must say that the latest version is very buggy & does not work well with Nokia 6110 Navigator. Infact I must say that this version has not been thoroughly tested on S60 3rd Edition v9.2 OS-based phones.

I have searched lots of forums & have hardly managed to find a solution to my problems. This is an independent opinion & may not match with others. The problems I am facing is listed below -
  • After configuring a mail account if you go to its Settings->Rules->Inbox & change the default setting for "Cleanup older than... 1 week" to None, all the mails downloaded in the Mail account disappear
  • I now have a new problem - I am receiving an audible mail alert, but the visual alert of "1 new mail" has stopped appearing on my main screen
  • After configuring multiple mail accounts if the bandwidth gets chocked while downloading mail for one of the accounts, the other accounts suffer & get an illogical error "Please check your login credentials "Wrong credentials provided. Please verify (-37)". This error does not necessarily mean that your login credentials are wrong
  • The icon appearing in the main screen is very cryptic. In previous version there were a couple of indications - a cross indicating disconnection from emoze Server, a red play sign indicating all read mails & successful connectivity with emoze Server, a green play icon indicating Sleep mode, a red closed envelope indicating unread mails & successful connection with emoze Server & a green closed envelope indicating unread mails in Sleep mode. In the latest version it either shows a red play icon showing disconnected state or a green play icon showing connected state
  • Unable to send any mails
I have managed to tweak with a lot of settings but have only one thing to conclude - emoze 2.0 is buggy with S60 3rd Edition v9.2 phones, probably because it is programmed for 3rd Edition v9.1 phones (emoze2_s60_91.sisx). I hope the people at emoze are working day & night to fix the bugs & restore users confidence in my favourite FREE Push Mail application.

Fixing Picasa moviethumb.exe Error

Many Picasa users might have found an irritating error after installing Picasa. Whenever Picasa is launched it pops up an error saying "Abnormal Program Termination c:\program files\google\picasa\moviethumb.exe . Microsoft Visual C++ Runtime Library". After doing quite a bit of Googling I have accumulated some data on this error which I shall share with you all -
  1. moviethumb.exe is the plugin which shows the thumbnails of all videos in folders watched by Picasa.
  2. The error happens due to conflicts with Picasa & other existing DivX codecs.
Solution - Since some people like me & many more are both addicted to both Picasa & also other existing DivX applications, we need to find a workable solution. The solution suggested is recommended by few experts on the Google groups & is not any authorised Google solution. Infact Google has still not provided a fix for this problem.

Though everything gets fixed if you uninstall Picasa, but the best way everything works out is by launching Picasa, clicking on Tools -> Options -> File Types & unchecking the Movies section.

This solution has currently worked for me & you may try out the same to fix this nagging bug.

3 FREE PC Security Tools to keep your PC / Laptop Safe & Secure

In an IT world full of Virus Attacks, Trojans, Hack Attacks, it becomes increasingly important to keep your personal PC safe & secure from unauthorized access. Since your personal PC is bound to contact lot of confidential data.

In this post I would share 3 FREE PC Security Tools which I have been using from quite long & have kept my personal PC & Laptop safe.

1. Anti-virus Software -

Among all FREE Anti-virus applications I have found avast! Home Edition to be quite light as well as effective solution from virus protection. You can download it by clicking on the pic given below.


2. Personal Firewall -

I have been using ZoneAlarm Free Firewall from almost 7-8 years from now & have found it to be very good for personal use. You can download it & try it out by clicking on the pic below.


3. Anti-Spyware -

Most newly turned techies seem to be quite aware of Anti-virus & Personal Firewall applications, but many still have no clue how much of a menace a Spyware & Adware program can be. To handle such menacing programs one can install SpyBot - Search & Destroy. Its Resident Shield functionality ensures that any major Registry Entry changes (like change in Startup, etc.) gets first authorised by the user, thus keeping your PC / Laptop safe from malicious Ads that get loaded as soon as your PC boots. To download Spybot click on the pic below.


This post contains just a brief description of the mentioned products. Please visit respective vendor's website for detailed product information. The icons used in this post are copyrighted by the respective application providers.

Geotagged Durgotsav at Mumbai

  • Are you new to the City of Mumbai?
  • Have you just missed out visiting different Durga Puja Pandals across Mumbai?
  • Are you owning a GPS enabled phone / device?
If all the answers to my above questions is YES, then I have a solution for you. I have found out the GPS co-ordinates of few selected Durga Puja Pandals which I had visited this year. This way I have Geotagged Durgotsav at Mumbai. This would help travellers in locating these Durga Puja Pandals when they plan out their trip for next year's Durgotsav.

I hope you have a pleasant Durgotsav at Mumbai next year.


Mumbai Durgotsav 2008 Wallpaper

Those who love the Durga Puja / Durga Pooja festival can set the image posted below as their Desktop Wallpaper.

From Durgotsav 2008

Durgotsav 2008 at Mumbai

After 5 complete days of festive mood I have again resumed my duties. These 5 days from 5th Oct to 9th Oct were really enthralling for me & my family & we thoroughly enjoyed the Durga Puja celebrated all across Mumbai. This post is primarily directed towards all those people staying in Mumbai, who are still not aware how grandly Durga Puja is celebrated in a multi-cultural city like Mumbai. Three cheers to the spirit of Mumbai.

Here are some snaps from Durgotsav / Durga Puja / Durga Pooja 2008 at Mumbai -


Here are some videos from Durgotsav 2008 at Mumbai -

Saptami Arati during Durgotsav 2008 -


Notun Polli Puja Pandal during Durgotsav 2008 -


Vashi Puja Pandal during Durgotsav 2008 -


Chembur Puja Pandal during Durgotsav 2008 -


Powai Puja Pandal during Durgotsav 2008 -


Kumari Puja during Durgotsav 2008 -


Dashami Arati during Durgotsav 2008 -


Puja before Visarjan during Durgotsav 2008 -


Durga Visarjan during Durgotsav 2008 -

Setting up your own Bed Switch

You might have always wished that after that late night movie you could have turned off your lights without getting off your bed. In this post I would teach you how to make your own Bed Switch.

Procedure -
  1. Open your CFL/Tubelight/Bulb holder.
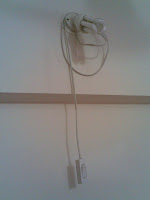
  2. Turn on the Switch & use a Tester to trace your Live & Neutral wires. n my case the Yellow wire was Live & is shown in the screenshot below.
  3. Now turn off your Switch & remove the Live wire from the holder socket.
  4. Get hold of a long wire pair (depending upon where you want to keep your Switch) & attach a Bed Switch at one end.
  5. At the other end, fix one wire to the point from where you had detached the Live wire from the holder & the other wire should be twisted with the detached Live wire & sealed using an insulation tape.
  6. Fix the holder back to the proper place.
Your Bed Switch should now be ready. To make best use of it always keep the main Switch from the Switchboard on & operate the room lighting from the Bed Switch itself.

Find it simple & interesting. Why dont you try out yourself.